9.5 KiB
| id | title |
|---|---|
| getting-started-cli | Getting started (CLI) |
Playwright Test was created specifically to accommodate the needs of end-to-end testing. It does everything you would expect from a regular test runner, and more. Here you will learn how to:
- Install Playwright using the CLI
- Generate tests though user actions with Codegen
- Write assertions, use fixtures and test hooks
- Run tests
- Debug tests using the Playwright Explorer
- See a detailed HTML report of your tests
- Run tests on CI
- See a trace view of your test with DOM snapshots
Installation
Install Playwright and follow the instructions to get started choosing either TypeScript or JavaScript, what name you would like your tests folder to be called and if you would like GitHub Actions to be set up.
-
Install Playwright in project's root directory
npm init playwright@latest -
Install Playwright in a new project
npm init playwright@latest new-project
For installing using the CLI see the Getting Started (VS Code) guide.
Generating Tests with Codegen
CodeGen will auto generate your tests for you and is a great way to quickly get started. It will open two windows, a browser window where you interact with the website you wish to test and the Playwright Inspector window where you can record your tests, copy the tests, clear your tests as well as change the language of your tests. The Playwright inspector is also used for debugging your tests.
-
Open Codegen
npx playwright codegen -
Open Codegen on a specific URL
npx playwright codegen playwright.dev

To learn more about codegen please see the Playwright Inspector docs.
Writing Assertions
Playwright Test uses the expect library for test assertions. It extends it with the Playwright-specific matchers to achieve greater testing ergonomics.
Learn more about test assertions.
Here is a quick example of using them:
// example.spec.js
const { test, expect } = require("@playwright/test");

test("my test", async ({ page }) => {
  await page.goto("https://playwright.dev/");

  // Expect a title "to contain" a substring.
  await expect(page).toHaveTitle(/Playwright/);

  // Expect an attribute "to be strictly equal" to the value.
  await expect(page.locator("text=Get Started").first()).toHaveAttribute(
    "href",
    "/docs/intro"
  );

  await page.click("text=Get Started");
  // Expect some text to be visible on the page.
  await expect(page.locator("text=Introduction").first()).toBeVisible();
});
// example.spec.ts
import { test, expect } from "@playwright/test";

test("my test", async ({ page }) => {
  await page.goto("https://playwright.dev/");

  // Expect a title "to contain" a substring.
  await expect(page).toHaveTitle(/Playwright/);

  // Expect an attribute "to be strictly equal" to the value.
  await expect(page.locator("text=Get Started").first()).toHaveAttribute(
    "href",
    "/docs/intro"
  );

  await page.click("text=Get Started");
  // Expect some text to be visible on the page.
  await expect(page.locator("text=Introduction").first()).toBeVisible();
});
Using test fixtures
You noticed an argument { page } that the test above has access to:
test('basic test', async ({ page }) => {
  ...
test('basic test', async ({ page }) => {
  ...
We call these arguments fixtures. Fixtures are objects that are created for each test run. Playwright Test comes loaded with those fixtures, and you can add your own fixtures as well. When running tests, Playwright Test looks at each test declaration, analyses the set of fixtures the test needs and prepares those fixtures specifically for the test.
Here is a list of the pre-defined fixtures that you are likely to use most of the time:
| Fixture | Type | Description |
|---|---|---|
| page | [Page] | Isolated page for this test run. |
| context | [BrowserContext] | Isolated context for this test run. The page fixture belongs to this context as well. Learn how to configure context. |
| browser | [Browser] | Browsers are shared across tests to optimize resources. Learn how to configure browser. |
| browserName | [string] | The name of the browser currently running the test. Either chromium, firefox or webkit. |
Using test hooks
You can use test.beforeAll and test.afterAll hooks to set up and tear down resources shared between tests. And you can use test.beforeEach and test.afterEach hooks to set up and tear down resources for each test individually.
// example.spec.js
const { test, expect } = require("@playwright/test");

test.describe("feature foo", () => {
  test.beforeEach(async ({ page }) => {
    // Go to the starting url before each test.
    await page.goto("https://playwright.dev/");
  });

  test("my test", async ({ page }) => {
    // Assertions use the expect API.
    await expect(page).toHaveURL("https://playwright.dev/");
  });
});
// example.spec.ts
import { test, expect } from "@playwright/test";

test.describe("feature foo", () => {
  test.beforeEach(async ({ page }) => {
    // Go to the starting url before each test.
    await page.goto("https://playwright.dev/");
  });

  test("my test", async ({ page }) => {
    // Assertions use the expect API.
    await expect(page).toHaveURL("https://playwright.dev/");
  });
});
Running Tests
You can run a single test, a set of tests or all tests. Tests can be run on one browser or multiple browsers. By default tests are run in a headless manner meaning no browser window will be opened while running the tests and results will be seen in the terminal. If you prefer you can run your tests in headed mode by using the --headed flag.
-
Running all tests
npx playwright test -
Running a single test file
npx playwright test test-1 -
Run a set of test files
npx playwright test tests/todo-page/ tests/landing-page/ -
Run files that have
my-specormy-spec-2in the file namenpx playwright test my-spec my-spec-2 -
Run the test with the title
npx playwright test -g "add a todo item" -
Running tests in headed mode
npx playwright test test-1 --headed -
Running Tests on specific browsers
npx playwright test test-1.spec.ts --project=chromium
Debugging Tests
The Playwright inspector is a great tool to help with debugging. It opens up a browser window highlighting the selectors as you step through each line of the test. You can also use the explore button to find other available selectors which you can then copy into your test file and rerun your tests to see if it passes.
-
Debugging all Tests
npx playwright test --debug -
Debugging one test
npx playwright test test-1 --debug
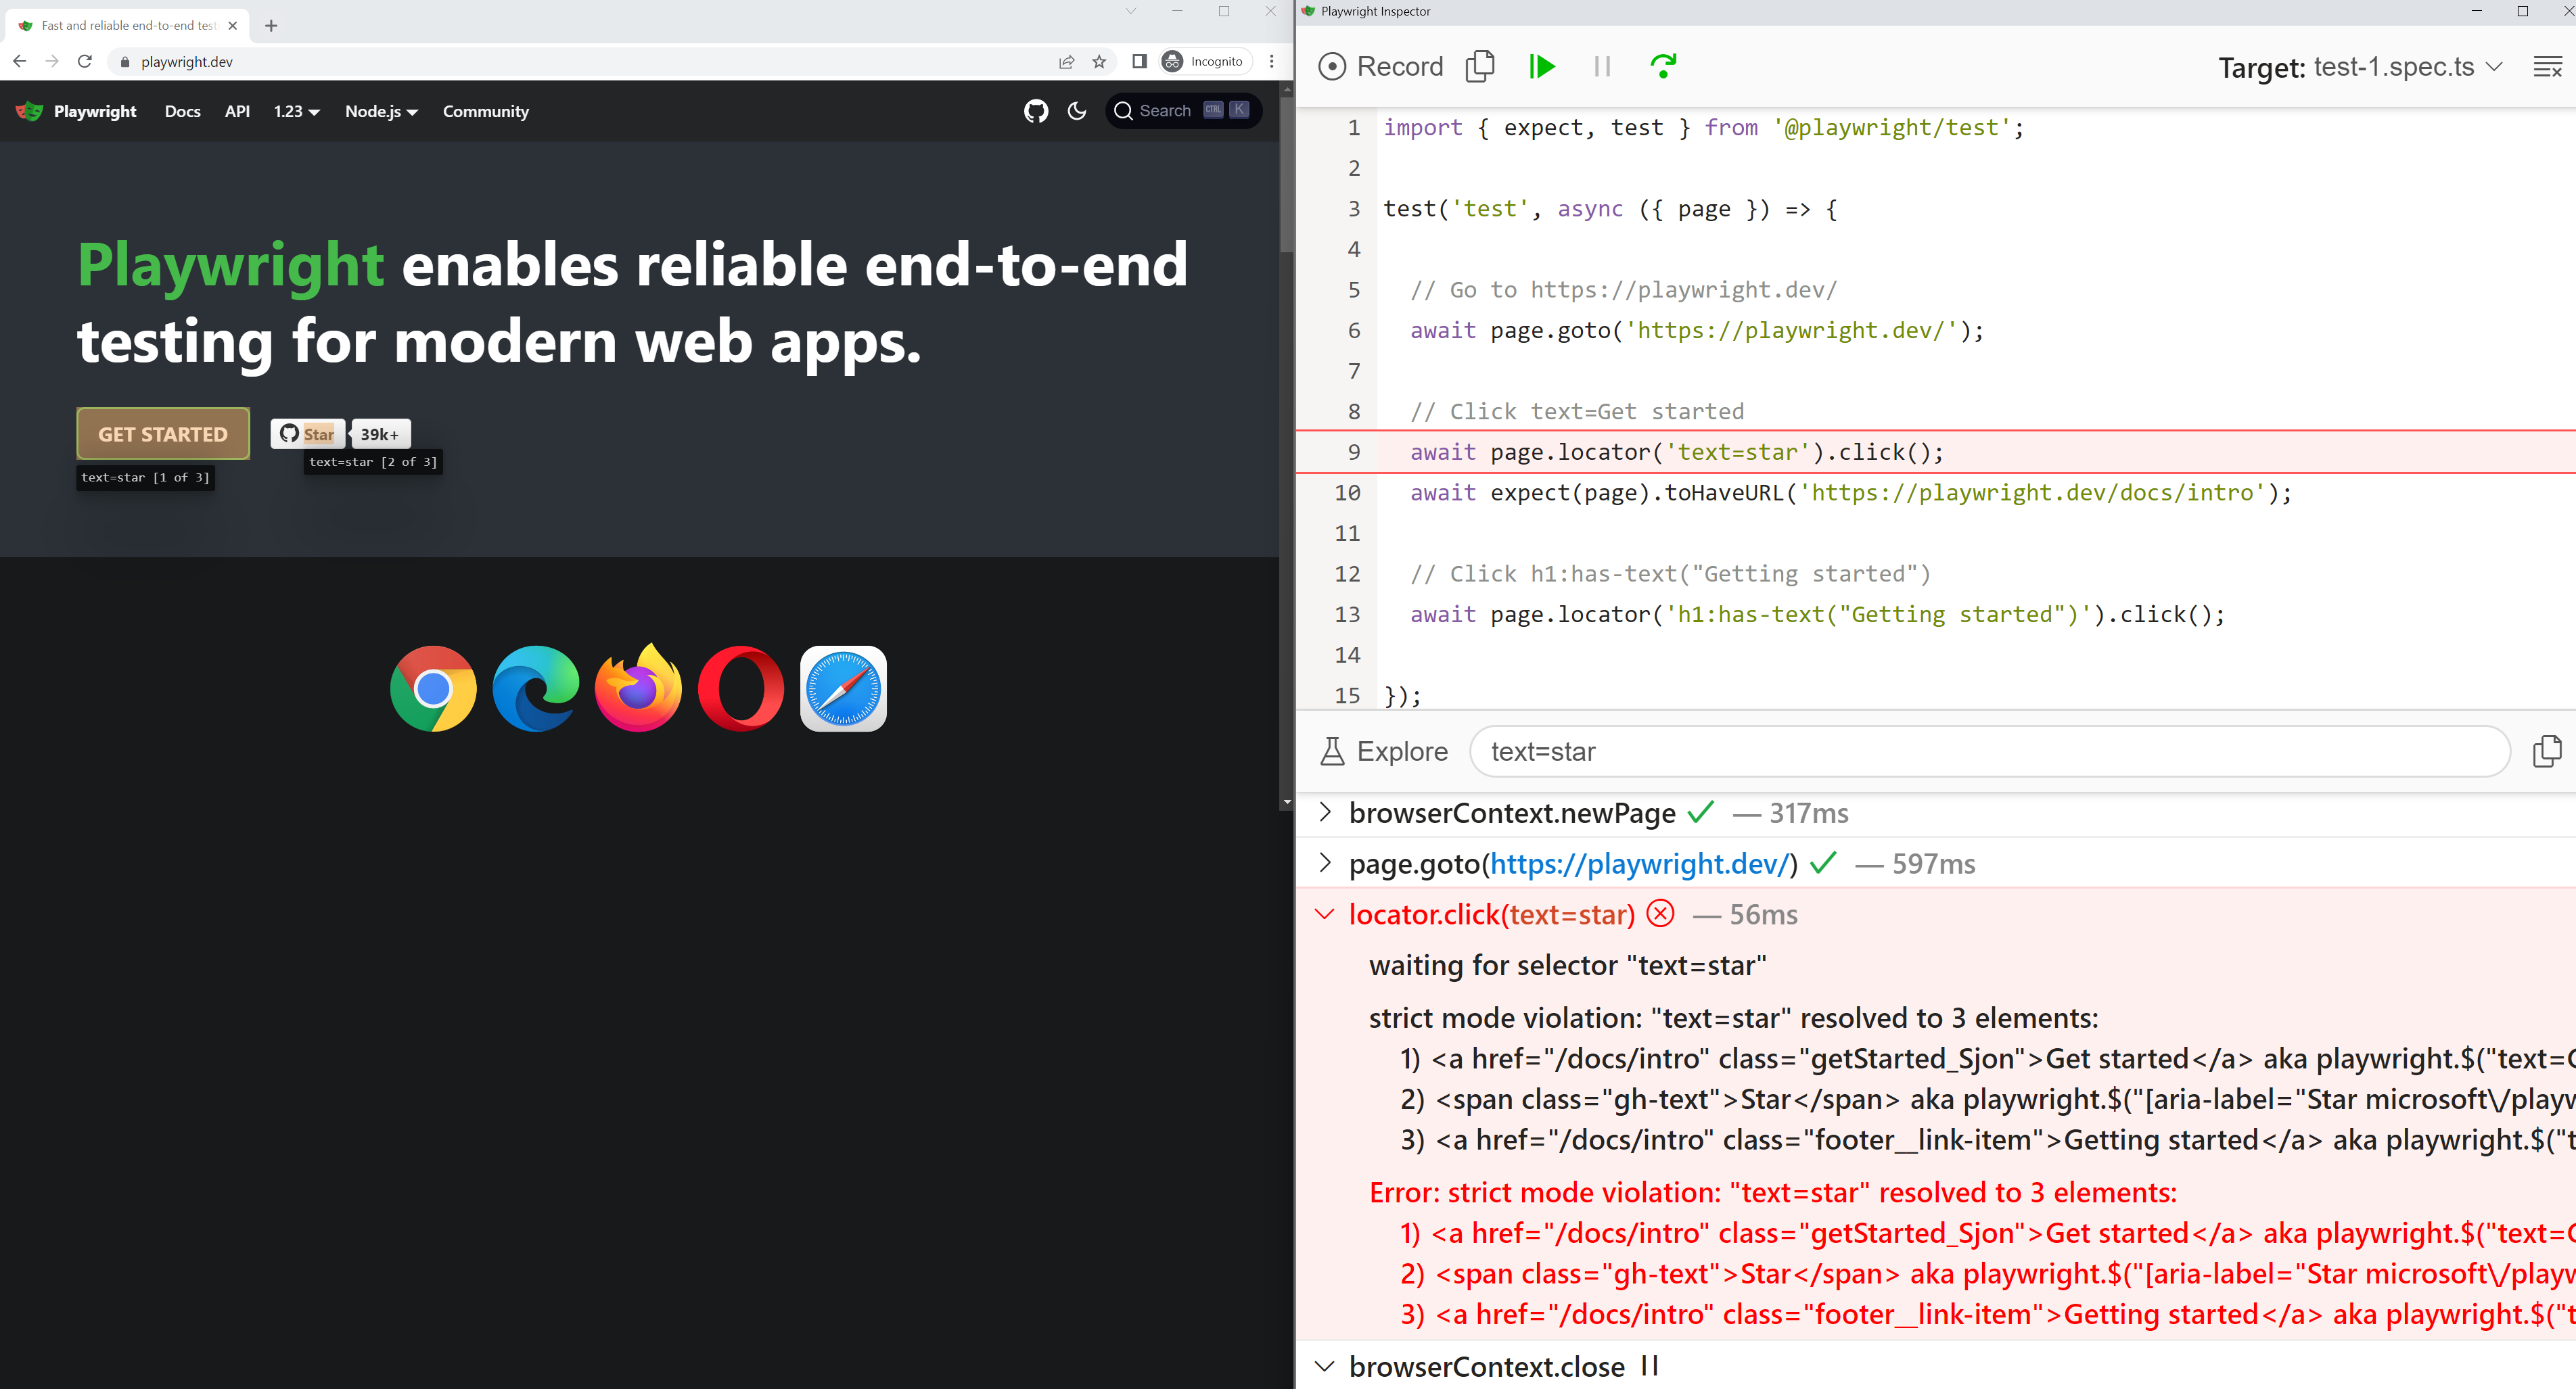
To learn more about the Playwright Inspector please see the Playwright Inspector docs.
Test Reports
The HTML Reporter shows you a full report of your tests allowing you to filter the report by browsers, passed tests, failed tests, skipped tests and flaky tests. You can click on each test and explore the tests errors as well as each step of the test. By default, the HTML report is opened automatically if some of the tests failed.
npx playwright show-report

To learn more about the HTML Reporter please see the HTML Reporter docs.
Running Tests on CI
Run your tests locally or on CI on each pull request with GitHub actions. Tests can be run on a local dev environment or on a staging URL. Checkout our guide for more options on CI Configurations.
Viewing Test Traces
Playwright Trace Viewer is a GUI tool where you can explore recorded Playwright traces after the script has ran. See your test's DOM snapshot before and after the action item. View the test's timeline, log, source, network and console. Open traces locally or in your browser on trace.playwright.dev.
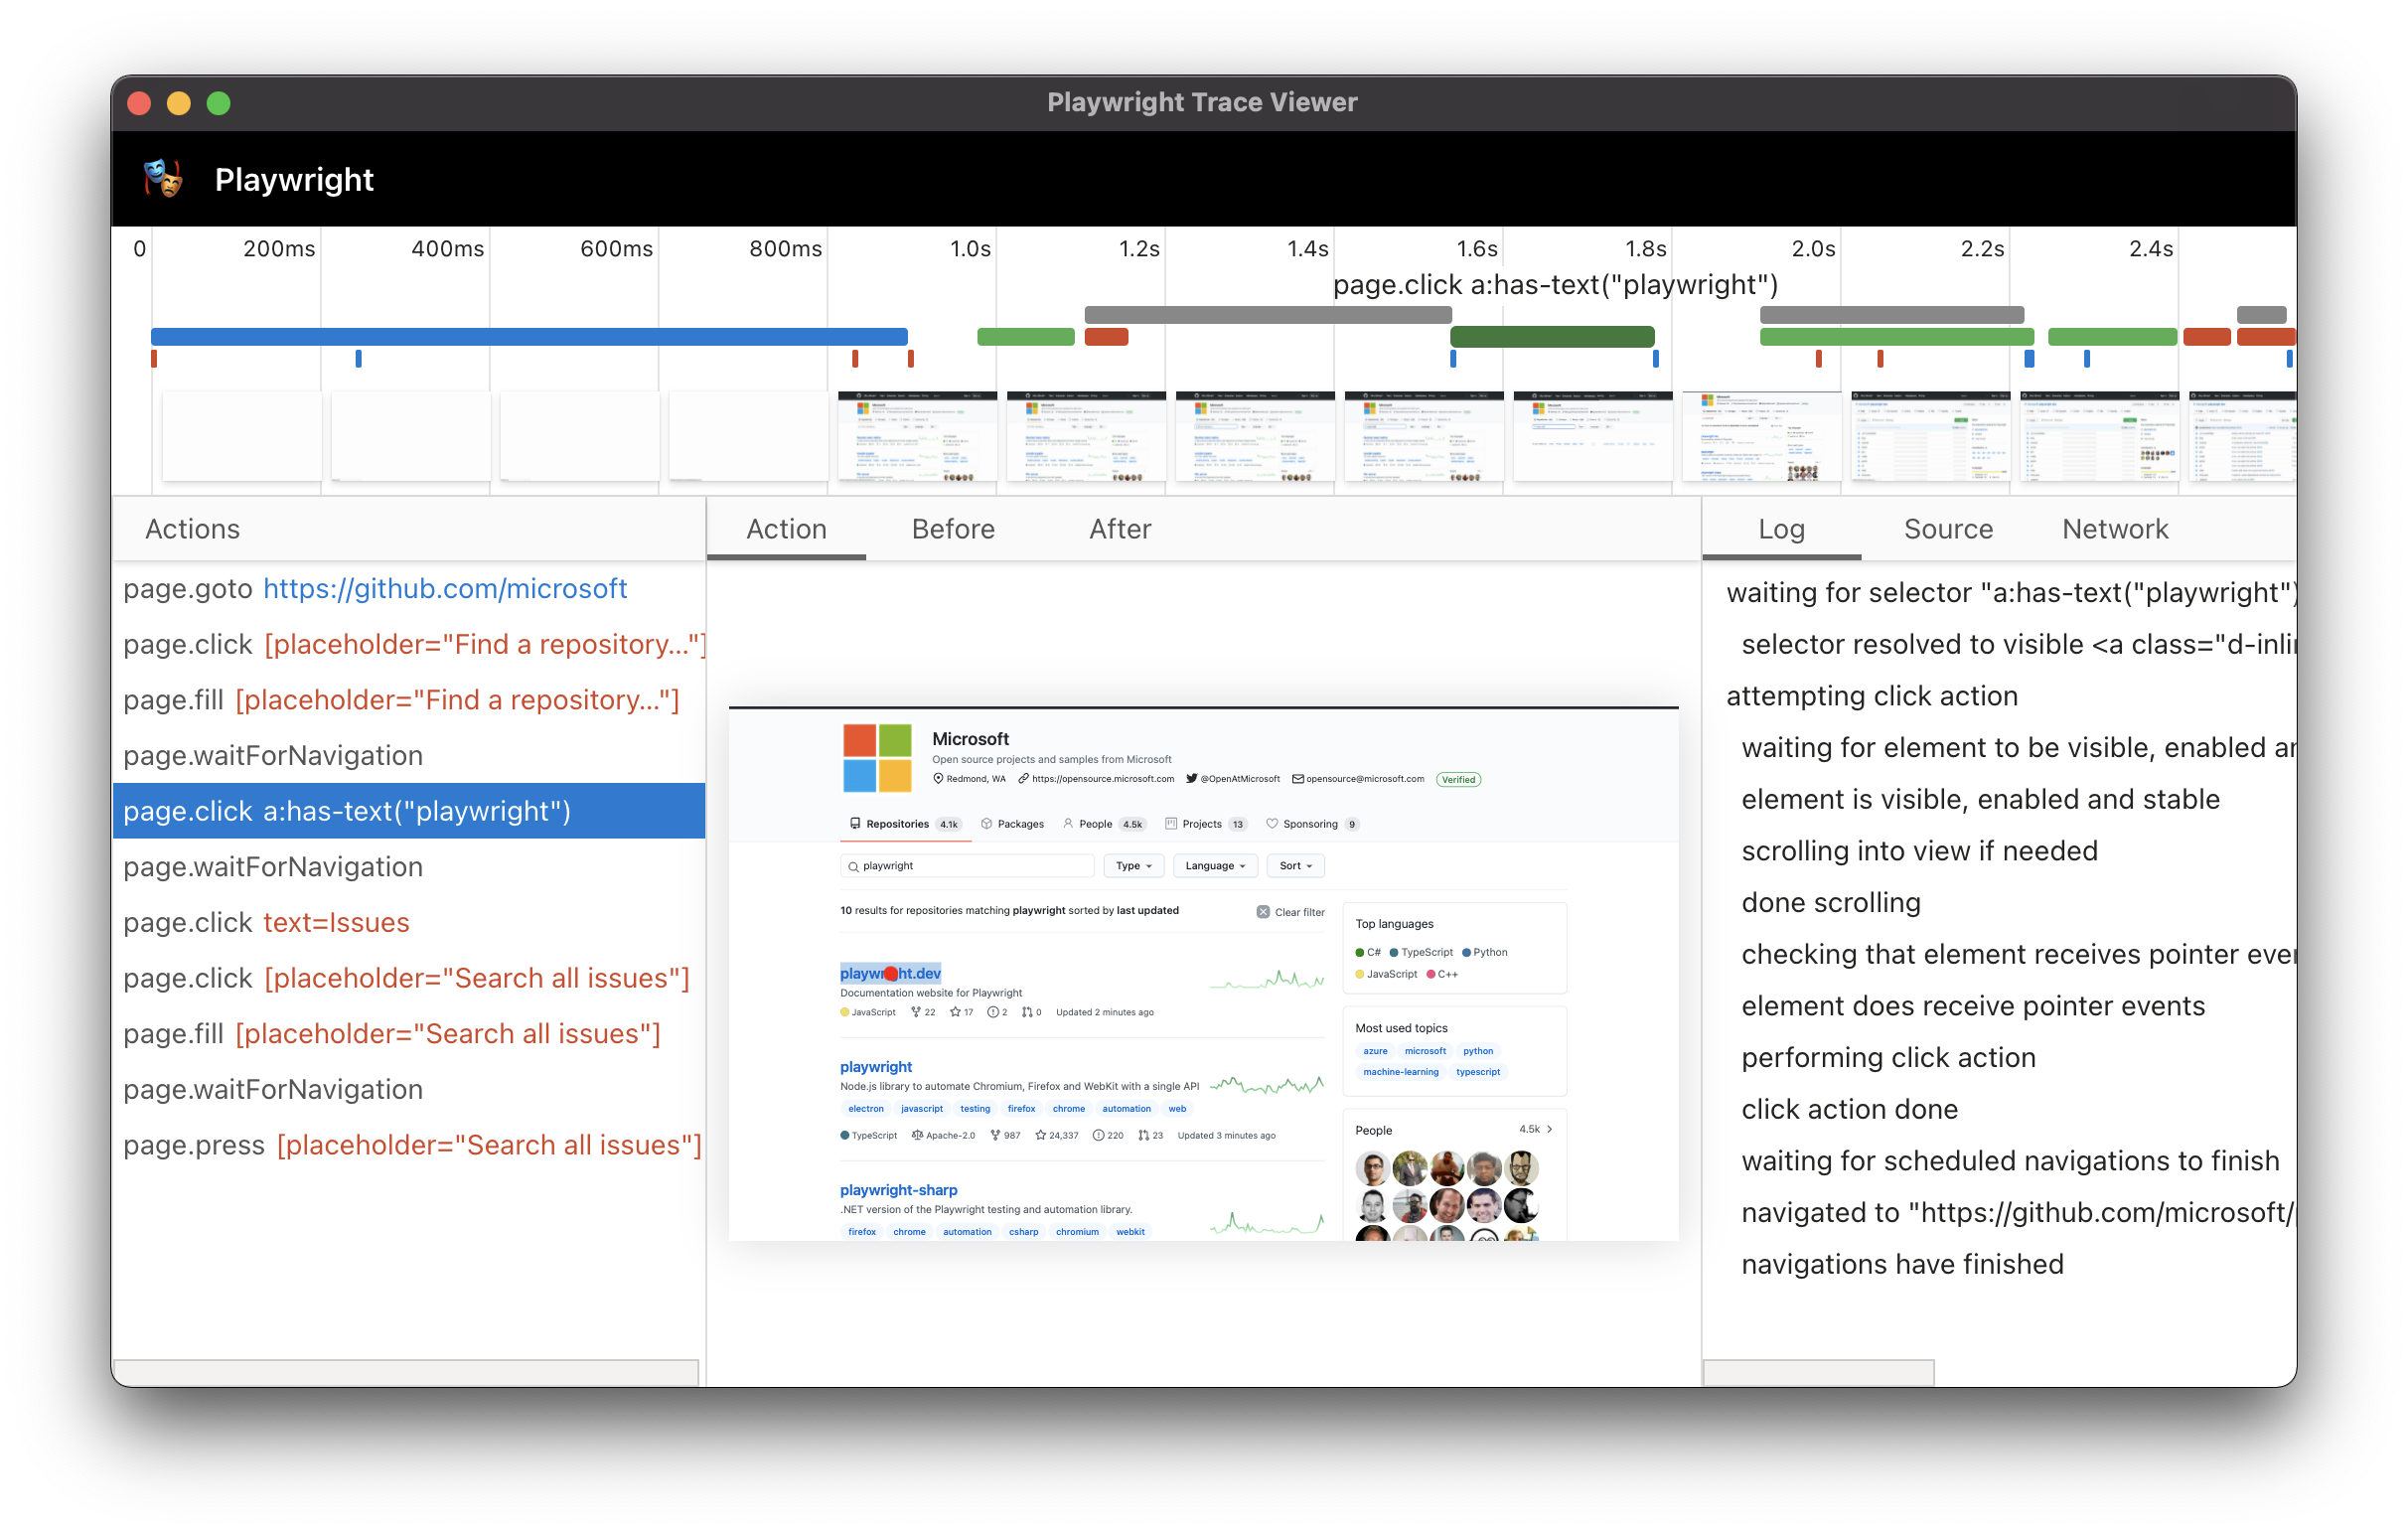
To learn more about the Trace Viewer please see the Trace Viewer docs.